Showing posts with label part4. Show all posts

Friday, 17 May 2013

Assignment 4. Real or fake?

This assignment concludes chapter four. Much of this chapter has revolved around the fact that it is now extremely easy to manipulate an image and that,with some careful work, it is possible to change the image in such a way that it no longer represents the truth. We have been asked to consider our own stance on this moral issue.

I am personally very clear about how I feel. In any context where the image is to represent news or factual information, I feel there should be no tinkering with the exception of some editing for clarity, such as lightening etc. Any images used to sell a product, should accurately depict this product. However, any associated imagery is not to be believed, and in my book is free for personal interpretation. Classic cases in question are models and their often digitally enhanced appearance. Fine art photography is a subject on to itself and anything goes.

For this assignment I have been asked to make a book cover and give my ethical justification for any work carried out on the image(s).

First, here is the cover...


The technical aspect

The cover consists of three images over a black background. The two obvious images are of course the noose and the hangman. There is a third image of some blurry trees which I will mention in more detail in a moment. Take a look at the images in their original form.


It is immediately apparent that some processing was carried out. Here's what I did.

Starting with a black background in Photoshop, I added a new layer with the tree image. This layer was set to about 90% opacity. Next, my friend Vincent was added to a new layer. To this I added a layer mask and with a large, soft brush painted out above his top hat and around his hands. The Vincent layer was set to overlay which allowed some of the trees to show through. Now, about the trees. If I had gone straight to the layer with Vincent, the Hangman, the image was to clean and lacked any form of atmosphere. Although you cannot see the trees in the finished image, they form a nice 'misty' texture and add a bit of mystery.

Before moving on to the layer with the noose, I added some soft 'black to transparent' gradients. some originating from the bottom left to blend Vincent in a bit better and one from the top down to create the dark area under the main title.

Next, the noose was added and the unwanted parts of the noose image were removed by way of another mask  For the final step text was added for the title and the strap line.

Ethical justification

I initially thought that there was no requirement for any ethical justification for the cover of a paperback novel but as I was typing it dawned on me that actually there is. The book I have chosen to represent is fictitious but if you were to take a guess at the content I suspect you would be thinking along the lines of Victorian based crime/horror story. This would indeed tally with what I imagined the book to be about. Imagine your horror then, if the book actually was a love story set in the year 3560! I would have deceived you with the cover and if you had hurriedly picked the book up at the airport with no time to read the synopsis, I wager you would be pretty unhappy on that flight! Therefore, I do have an  ethical obligation to represent the contents of the book accurately. 

With regard to the content of the picture? Well Vincent is a jolly nice chap and would never hang anybody. He is aware that the image would be used to picture him as a hangman, so there is no ethical dilemma here. Had I snapped a complete stranger and then used the image in the same manner I would be acting in a non ethical manner and could possibly end up in trouble.


Monday, 1 April 2013

Alteration

In this last exercise of part 4, I am going to edit a photograph to show a complete untruth, by removing an element. Take a look at the picture below...

Not a very exciting picture but I spotted this lady with her dog when I was out walking. I did like the decorations on the sea wall though, and the fact that the dog was looking over the wall like it's owner.

This isn't actually what I took with the camera though. There was also a boy in the group. Scroll down to the end of this post to see the original picture.

The tools I used for this task were primarily the clone stamp tool, a little use of the patch tool and the selection tool in Photoshop.

I started by using the patch tool to get rid of most of the boy's upper body which was hiding the sea behind. Then using the clone tool I cleaned this up and cloned out the boys legs. Creating the missing part of the crab required me to copy the section that was visible on the wall and then flip this to create the missing area. This required a bit more cloning to fill in some missing gaps. Finally I used the clone tool again to cover any left-over bits.

As well as a straight replacement of areas I didn't want in the completed image, I also had to use my imagination a little. The shadow area on the path had to be adjusted so as not to show the shadow of the boy any longer. This took a little bit of guess work on my be-halve but hopefully I have just removed the boys shadow.

The picture I originally took is shown below...

Tuesday, 25 September 2012

Enhancement

Furthering the investigation into my personal view on altering images and at which point an innocent edit becomes more than just that, I have made two more edits.

The adjustments I have made to the two images are localised to the face and eyes only. For this I have used the Adobe Lightroom software package. One of the tools available is a paintbrush tool which allows an area to be ‘painted’. This area can then be adjusted with whatever settings you wish to apply. To soften the transition between the effect and the unaltered image, an adjustable feathered edge can be applied.

For the first image I have set the brush to adjust exposure with a soft edge and then painted over the girls face, stopping at the hairline. I then lifted the exposure to lighten the face. In doing this I have tried to keep the image looking natural.

For this image I am happy that it still reproduces the girl faithfully. She did after all look like this and had the light been in a slightly different place, her face may have been lit the same way. 

Image with the face brightened.
The second image has built on the first by having the eyes enhanced further. The the eyes have then been given another colour. This was again done with the localised brush tool but I reduced the feathering to work on the smaller area of the pupils. First steps were to increase exposure and contrast. 

Image with face brightened and eyes coloured.
This is the first time that I felt the edits were starting to go beyond what was actually recorded on the camera. This was then taken way over my personal limit by changing the colour with the ‘tint’ settings, even though the colour still looks natural.

Wednesday, 19 September 2012

Improvement or interpretation?

The following image has undergone some processing similar to traditional dodging and burning. I have isolated the figure and pallet using the polygonal lasso tool and feathered the edge of the selection by a few pixels in an attempt to soften the edge of the cut-out. Then I have worked with a levels adjustment layer,  the objective being to lightening the figure.

I have tried to lighten the figure without the end result looking 'false'. I think this has worked very well.

Portrait with selection altered with levels.

The exercise is again asking me to consider the limits of this image manipulation. I find the level of work carried out here quite acceptable. Even if I had lightened the figure more, I don't feel it is telling an 'un-truth' although the image will look false. My reasoning for this is that the image is still displayed as it was seen albeit a little lighter.

This is of course all highly subjective. Other photographers my have different opinions. My own opinions differ depending on the final use of the image.

Monday, 10 September 2012

Correction

This chapter encourages us to explore the boundaries of what constitutes 'fake' and  'real'.

With modern technology we have complete control over the image that is presented, much more so than with traditional photography. With skill and practice it is possible to create completely fictitious photographic situations. By some this is considered art, others may see it as fraud. To better understand my own feelings on this subject and to find where I myself draw the line between tidying up a picture and distorting the truth, I am editing the following two images from the course web site. The two images provide two different editing situations.

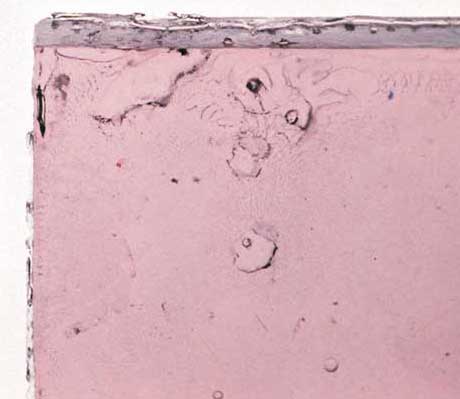
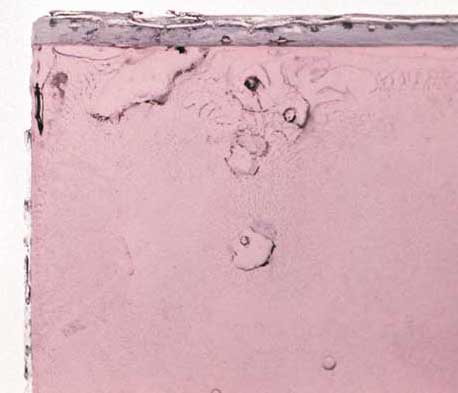
In the first image I am going to clean up dirt spots. As most of the image consists of similar dust marks, I have shown a section of the image at 100%.


Before clean up with dust spots in place.
Without dust spots.
My own feelings about this first exercise are feelings of frustration! The photographed objects appear to be of some kind of transparent substance, i.e. glass or resin. The objects have dark marks all over them but it is not clear if these are dust spots or some property of the materials. As I did not photograph the objects and have never seen the real thing, I am finding it very difficult to be sure that some of the dust spots I am correcting are actually dust spots! It can be argued that somebody looking at the end results would have been unaware of the original marks but then they are falling prey to my version of what was in front of the lens.

For the second part of this exercise I have to remove some lens flare, seen on the left hand side of the image below. I have used the clone tool in Photoshop, set to colour to remove as much of the flare as possible.

The original image with flare visible on the left.
This was very difficult to carry out as there is not always a clean area to clone from. As before, it is not always possible to see what the underlying colour and texture should be. I spent quite a lot of time doing this and still believe it was not long enough and could have been done better.

Lens flare removed with clone tool set to colour.
What are my thoughts about this though? Well this was slightly easier to work on than the previous shot as it was easier to relate to what is being shown. Removing the flare in this instance has made for a more enjoyable picture. A big part of me still thinks it would have been better to get the shot without the flare, after all, had I made a better job of the cloning would only prove that I am good at Photoshop, not necessarily photography!